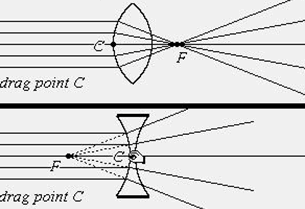
How do Lenses Affect Light?
School of the Future, Manhattan
Summer Research Program for Science Teachers
August 2011
Subject: Regents/General/Conceptual Physics
Grade Level: 11 & 12
Time Frame: 1 Period
Objective:
By
the end of this lesson, students will be able to explain the difference between
converging and diverging lens (using words and pictures)

Motivation: To understand how telescopes work, students must have a basic understanding of lenses (and mirrors). This activity will give students their first exposure to seeing the way that different lenses can bend light.
Materials:
Push Up (Do Now):
1. Give each group of students a set of lenses.
2. Ask them individually (without talking to their group mates) record anything they notice about the lens as well as questions they think of related to the lenses in their notebooks in a chart. (3 minutes)
|
|
Lens #1: |
Lens #2: |
Lens #3: |
|
Observations: |
|
|
|
|
Questions:
|
|
|
|
3. After five minutes, ask them to share out their observations and questions with their group mates and record them on a whiteboard. If a group mate made an observation you missed, asked the group mate to show you what they saw and then record the observation in your own notebook. (3 Minutes)
4. After five minutes, share out the observations and questions as a class. Ask one person from each group to share. (4 Minutes)
Main Activity: Drawing Preliminary Ray Diagrams for Lenses:
·
Tell students that we are going to explore the
following question: “How does a lens affect light?”
(Ideally, this is one question the students came up with above.)
·
Have the following instructions on the board (or
on a handout):
Part I: Examining the Lenses (15 Minutes)
1.
Place the first lens on the paper (flat side on
the paper so lies flush with the paper) and outline it with your pencil.
2.
Using a ruler, draw five parallel lines that go
toward the lens with the blue marker.
3.
Place the laser pointer on the paper and use it
to shine the light such that it follows the path of one of the drawn lines.
Using the red marker, draw the path of the light after it leaves the
lens.
4.
Repeat Step 3 for each parallel line.
5.
With a fresh sheet of paper, repeat steps 1-4 for
each remaining lens.
Part II: Analyzing the Light Patterns (10 Minutes)
1. Sketch the pattern of light
rays for each lens into your notebook.
2.
What do you notice about
the path the light takes after traveling through each lens?
Describe the effects that the lens has on the light for each lens.
|
|
Lens #1: |
Lens #2: |
Lens #3: |
|
Sketch of Light Ray Pattern |
|
|
|
|
Written Description |
|
|
|
Part III: Class Discussion (10 Minutes)
1.
Split the six groups in
half (two sets of three groups).
Give each group in each set one lens to present on their whiteboards.
(5 Minutes)
2.
Have each group present to
the other groups in their set of groups.
(5 Minutes)
Homework:
Research the following questions at home:
1.
Look up the names of the
types of lenses we were using today.
Explain why these names are appropriate based on what you saw today in class.
2.
What is the name of the
point where the rays of light cross paths?
Do all lenses have this point?
3.
PREDICT:
What type of lens do you think each of the following objects use and
explain why: (a) Camera (b) Magnifying Glass (c) Eye Glasses?
Once you’ve explained your prediction, research the answers online.
New York State
Learning Standards:
Standard 1 – Analysis, Inquiry, and
Design
·
Key Idea 1: The central purpose of scientific
inquiry is to develop explanations of natural phenomena in a continuing,
creative process.
Standard 4 – The Physical Setting
·
Key
Idea 4.3vii:
Observe,
sketch, and interpret the behavior of wave fronts as they reflect, refract, and
diffract
·
Key Idea 4.3viii: Draw ray diagrams to represent
the reflection and refraction of waves