Micropipette and the Metric System
Urban Action
Academy High School, Brooklyn
Summer Research Program for Science Teachers
August 2010
Subject:
Living Environment/Biology
Grade Level: 9th to 5th
Duration: Teacher's prep - 1 hour; One class period (50-60 minutes)
Aim: How to measure volume more accurately
Performance Objective: Students Will Be Able to learn to use micropipettes accurately and to measure volumes using metric units including microliters.
Purpose: Work with DNA and enzymes frequently involves measuring very small volumes, often in the microliter range. The liter is the metric volume standard, and one microliter (μl) is one millionth of a liter. To make these precise measurements, the molecular biologist uses a micropipette.
Materials:
Concept: Work with DNA and enzymes frequently involve measuring very small volumes, often in the microliter range. A microliter (μl) is one millionth of a liter. Liquid measurements in the metric system are made in units based on the liter where a liter is about one quart. To make these precise measurements, molecular biologists use a precision tool known as a micropipette. This tool is as basic to their lab work as a hammer is to a carpenter. Micropipettes come in many models and sizes.
Objectives: In
this lab, you will learn to use micropipettes accurately and to measure volumes
using metric units including microliters.
Mastery of this technique is essential for good results in the activities
to follow.
Use the following information to calculate metric volume conversions:
1 liter = 1000 ml (milliliters) 1 ml = 0.001 liter
1 liter = 1,000,000 microliters 1 microliter = 0.000001 liter
Microliter = μl = lambda (l)
Lesson:
For accurate measurements and to prevent damage to the micropipettes, follow
these important guidelines:
SETTING
AND
PREPARING
THE
MICROPIPET
There are
four
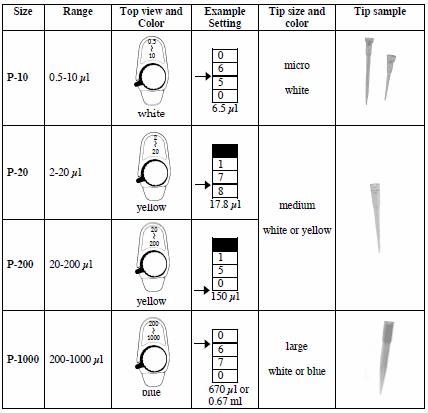
common sizes of micropipettes. See the guide below for these sizes and volume
ranges.
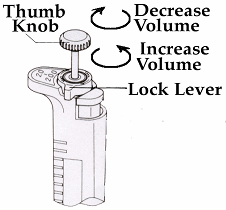
1. Choose a micropipette and set the volume by loosening the black lock lever,
turning the thumb knob to set the volume and then
gently
tighten the lock lever. Make sure to recognize the decimal point for your
micropipette (indicated by the in the table below) and to stay within the volume
range.
2. Using the guide below, select the correct tip for your micropipette.
Firmly push the end of the micropipette into the open end of the tip
while the tip is still in the tip box. (Avoid twisting the micropipette as this
can unscrew the shaft.) Lift the tip from the box, but don’t touch the tip near
the smaller end.
Touching the tip contaminates it and will contaminate your samples.

Refer to the Protocol Card for more information
Oxford Micropipette and Tip Guide

OPERATING
THE
MICROPIPET
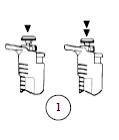
1. Find the stops
Hold the micropipette in your hand.
Use your thumb to depress the plunger.
Practice slowly depressing the plunger and feeling the two “stops.

2.
Draw some sample fluid from your microtube
Push the plunger knob down to the first stop.
Keeping the plunger down, lower the tip into the sample fluid just below the
surface (~2 to 3mm).
Gradually release the plunger.
Do this slowly to avoid sucking liquid inside the shaft of the pipette.
After filling, wait 1 second then remove tip from liquid.

3. Check the tip of the pipette
See how much fluid you have. Make sure that there is no air bubbles trapped
in the tip. If so, redraw the sample. Make sure that there are no drops
clinging to the outside of the tip.
4. Release the fluid from the pipette
Lower the tip into the microtube and lightly touch the side or bottom of the
tube.
Slowly depress the plunger to the first stop.
Wait 1 second, and then push plunger to the second stop to expel the last bit of
fluid so that the pipette tip has no fluid left in it. Keep the plunger pushed
down as you take the pipette out of the tube, then slowly release the plunger.

5. Eject the tip into a waste tip container by pushing the tip ejector button.

Viscous fluids: If you are pipetting a liquid that is very thick or viscous, it is especially important to insert the disposable tip just into the liquid that you are measuring (say 2 mm). If you immerse the tip fully, large volumes of liquid will stick to the outside of the tip giving you a very inaccurate measurement. With viscous solutions, it is also important to move the plunger up and down slowly. Being able to do this makes you a real pro.

New York State Standards:
Key Idea 3: The observations made while testing proposed explanations, when analyzed using conventional and invented methods, provide new insights into natural phenomena.
3. i Use various methods of representing and organizing observations (e.g.,
diagrams, tables, charts, graphs, equations, matrices) and insightfully
interpret the organized data.
National Science Standards:
9-12 Content Standard A - Identify the questions/concepts that guide scientific inquiry