NAME________________________DAY_____PERIOD____DATE_____
LIVING ENVIRONMENT LAB # 1
Aim: How do I prepare DNA-fragments and an agarose-gel for gel- electrophoresis?
Materials
![]()
per group of 2 students
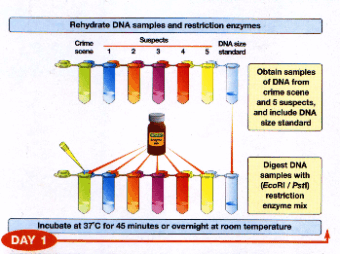
S DNA samples (many educational companies offer DNA kits, used in this protocol is the kit offered by biorad, see diagram)
S DNA size standard (from biorad kit)
S Restriction enzymes (biorad: EcoRI/PstI mix)
S Sterile water, 100ml
S Styrofoam test tube racks (included in kit)
S 1 2-20μl adjustable micropipet
S 20 pipet tips
S eppendorf tubes (from kit)
S marker
S 100ml 1X TAE-buffer (Recipe for 50X stock-solution: 242g of Tris base, 57.1ml of glacial acetic acid, 100ml of 0.5M EDTA pH 8.0)
S 1 1000ml erlenmeyer-flask
S 1g agarose powder, electrophoresis grade
S thermal gloves
S 1 electrophoresis casting tray
S 1 comb
S tape
S Latex gloves
S Plastic wrap
per 2 groups of 4 students
£ 1 digital scale
£ 1 100ml graduated cylinder
£ bucket filled with crushed ice
additional equipment
£ incubator or hot water bath (37 C)
£ freezer (-20 C)
£ Microwave
Introduction
![]()
In order to form a distinctive and individual pattern on a gel, DNA has to be cut into fragments first. The “molecular scissors” that are used to do this job are called restriction enzymes. Restriction enzymes recognize specific 6 base pair sequences and cut the DNA strand wherever they come across such a sequence. In the DNA obtained from different individuals, these sequences or restriction sites are at different positions. Therefore, the fragments of different DNAs will differ in their length.
DNA is a negatively charged molecule. If these DNA-fragments are put into an electric field, they will move from the negative toward the positive pole.
A gel is introduced to increase the difference in speed between smaller and larger fragments, so that they separate better and form a characteristic banded pattern.
Procedure
![]()
1. Restriction of the DNA-samples:
a. Put on latex gloves and wear them throughout the complete procedure.
b. Obtain one of each of the following colored microtubes. Label each lid with the date, group and the period number. Put them in your foam rack. Label the green tube CRIME SCENE, blue, orange pink, red and yellow SUPECT 1,2,3,4,5.
c. Locate the clear microtube that contains the restriction enzyme mix, labeled “ENZ”.
d. Using a fresh tip for each sample, transfer 10μl of each sample from the colored stock tubes into each of the corresponding labeled colored tubes.
e.

Using the micropipette and a new pipette tip for each sample, transfer 10μl of the enzyme mix “ENZ” to each reaction tube (see diagram). Do NOT put anything into the DNA standard.
f. Mix the contents. Close the cap on all the tubes. Mix the components by gently flicking the tubes with your finger. Then briskly shake the tube like a thermometer – once is sufficient.
g. Place the tubes in the floating-rack and put them in the incubator or into the hot water bath for 45 minutes
h. Your teacher will store the restricted DNA in the freezer until the next lab period.
2. Making the gel
a. Measure 100ml 1X TAE-buffer with your graduated cylinder. Pour it into the Erlenmeyer flask.
b. Weigh 2g agarose with the digital scale. Add it to the TAE-buffer.
c. Heat the mixture in the microwave for 2 minutes, put on thermal gloves to shake it, heat another minute (or use a magnet stirrer to boil it).
d. Let it cool down until you can just touch it without burning yourself (ca. 55 C).
e. Tape the electrophoresis casting tray on both open ends.
f. Label the tape with date, group and period number.
g. Insert the comb.
h. Pour the gel into the casting tray around the comb.
i. Your teacher will store the gel for you until the next lab period.
j. CLEAN UP!!